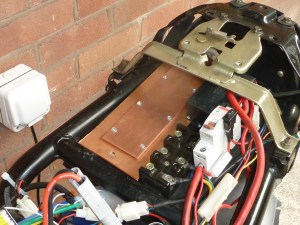
A custom, copper heatsink and mount are bolted to the baseplate, extending it to the rear to accommodate the larger, 18-FET controller
Parts
- 4 pieces of – 100 X 260mm 0.3mm copper sheet
- 3 pieces of – 60 X 260mm 0.3mm copper sheet
- One piece of – 60 X 220mm 3mm copper sheet
- One piece of – 60 X 220mm 0.3mm copper sheet
- 6 3.5mm countersunk head bolts
Having upgraded both the hub motor and the controller, I thought I’d take the opportunity to incorporate a custom heatsink into the rear mounting plate. The current 1500W hub motor is basically maxed out now, with the 16-FET controller more than enough to give it all it can take (about 4KW), so the controller doesn’t run very hot at the moment, but in order to clear an upgrade path for a more powerful hub motor, as well as address an issue with mounting controller that’s too big for the baseplate, I decided to design a heatsink custom made to maximise contact with the controller casing.
Most controllers are either 180mm or 210mm from end-to-end of the baseplate. This one, though is 260mm, and as you can see from the picture above it overhangs the baseplate by 50mm or so. My solution to this was to build a heatsink that would also double as an extension for the baseplate. By stacking cut pieces of thin copper sheet of alternating width and bolting them firmly to the base, I get good wide fins that help with heat dissipation. The air being funnelled to the controller area, and the good thermal contact with the base plate should both help draw heat away from the controller.
Below you can see stage one of the heatsink which acts as the main base for the controller.
As any of you who have dabbled with controller will know, however, the controller casing has an odd recess underneath that prevents most of the controller case making good thermal contact. Only the brackets at the end, and a section of case running the length either side make contact with the baseplate when the controller is mounted. The recess is about 3.2mm, and I had two special pieces cut to act as a seat that would allow the base of the casing to make near-complete thermal contact with the heatsink.
Below you can see the main item, a 3mm thick slab of copper, and a thinner 0.3mm sheet of the same size that brings the plate almost flush with (actually about 0.1mm proud of) the controller base.
The tricky bit in mounting this on top of the first stage of the heatsink is to do it in such a way that the heads of bolts are sunk so they are flush with the base of the controller case. Any bolt poking up will stop the case from making good thermal contact.
After some fiddling with different drill bit sizes, and very gentle drilling I eventually ended up with a second stage plate with six suitably recessed bolt holes.
Finally, six corresponding holes were drilled through the heatsink base sheets and the baseplate. From the underside, you can see both parts of the heatsink now firmly bolted to the baseplate. I cut off the excess lenghs of these bolts with a grinder. You can see how the heatsink adds the extra required length to the baseplate from below.
The finished product! A nice big heatsink that doubles as a lengthened baseplate for the controller.
A final touch before mounting the controller was to remove some instructional stickers that were on the base. Thus, the aluminium of the base sits directly onto its heatsink mount.
And there you have it. A solid heatsink that helps keep things running nice and cool. You can see a thermocouple I attached so I could monitor its performance. The most striking difference is that though the controller still gets warm when thrashed, it cools down much quicker, with the rate of cooling directly proportional to how hot it’s getting. Definitely a must for people who like to push their controllers to the limits.


 Posted by Zenid